Handling Access Controls for Splunk
As clusters grow and mature, the number of users using the clusters tends to increase at a similar rate. With organizations the size of mine, (30,000+ employees globally), considerations on employee turnover with regard to access controls for Splunk can be handled in numerous ways. LDAP, RADIUS, or Splunk SAML authentication is a great help to automating employee on- and off-boarding within your Splunk ecosystem. When your SAML provider is properly configured, Splunk can be very easy to configure to work with a large variety of SSO/SAML providers. These configurations can be done either through the UI or via configuration files.
What if your organization is at such a scale that you can’t have the attributes Splunk needs to handle authorization of users when configured to use SAML authentication? In this case, things get a bit trickier.
The prerequisites for configuring SAML SSO in Splunk are as follows:
- Either:
- A running version of Splunk software, OR
- A managed deployment of Splunk Cloud. Self-service deployments of Splunk Cloud log in through the Splunk customer portal and can’t independently configure Splunk SAML SSO.
- An identity provider configured to provide the role, realName, and mail. The supported identity providers are:
- Ping Identity
- Okta
- Azure AD
- AD FS
- OneLogin
- Optimal
- CA siteminder
- An admin role (on-premise) or sc_admin role (cloud) with the change_authentication capability. This permission level lets you enable Splunk SAML and edit authentication settings on the Splunk search head.
Note that any SAML IdP that is v2 compliant should be configurable, including the following tested IdPs.
- SecureAuth
- Novell Directory
- G Suite (Formerly Google Apps for Business)
For assistance with any IdP not documented in this article, contact Support.
In this article, we will be using Ping identity without the required role, full name, and mail attributes.
Before we continue, let’s take a moment to discuss the difference between authentication and authorization. From experience, not a lot of people fully understand the difference between the two, so let’s define both.
- Authentication is the process of verifying who you are. When you log on to a PC with a username and password, you are authenticating.
- Authorization is the process of verifying that you have access to something. Gaining access to a resource (e.g. directory on a hard disk) based on the permissions configured on the resource is an authorization.
Now that we’ve established the difference between the two, let’s look at how it applies to Splunk.
Authentication in Splunk
NOTE: The default $SPLUNK_HOME location is /opt/splunk, but this can be different per installation.
Splunk’s default authentication settings are stored in the authentication.conf file located in $SPLUNK_HOME/etc/system/default. Any changes to the authentication configuration that you make will need to be placed in $SPLUNK_HOME/etc/system/local/authentication.conf, or a custom app in $SPLUNK_HOME/etc/apps/<custom_app_name>/default/authentication.conf.
Authentication can be handled in a number of ways. Local, RADIUS, SAML, LDAP, proxied SSO, or a scripted authentication method you’ve written yourself are a few examples. The authentication type configuration is handled in authentication.conf by the authType stanza in the [authentication] global setting header:
authType = [Splunk|LDAP|Scripted|SAML|ProxySSO]Splunk defaults to local authZ handled in $SPLUNK_HOME/etc/passwd, but we’ll get to that in a later section. Since we are covering SAML in this document, we will be setting authType to SAML. For the sake of simplicity, we will be configuring SAML through splunkweb.
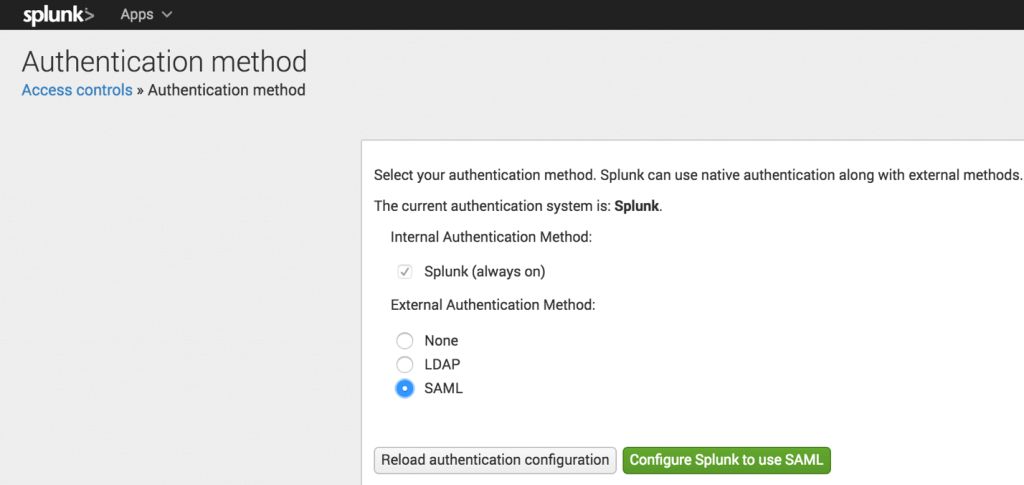
To start this process, we will need to set our authentication method to SAML. This is located in the Authentication Method section of Access Controls in Splunk Web. You will need to use an account with admin privileges. Splunk defaults to local authZ handled in $SPLUNK_HOME/etc/passwd, but we’ll get to that in a later section. Since we are covering SAML in this document, we will be setting authType to SAML. For the sake of simplicity, we will be configuring SAML through splunkweb.

Once we have set the radio button to SAML, we’re will need to start the configuration process for SAML. Click the configure button and we’ll be on to our next steps.
***BEFORE CONTINUING PAST THIS POINT YOU WILL NEED AN IDP METADATA FILE FROM YOUR SAML PROVIDER***
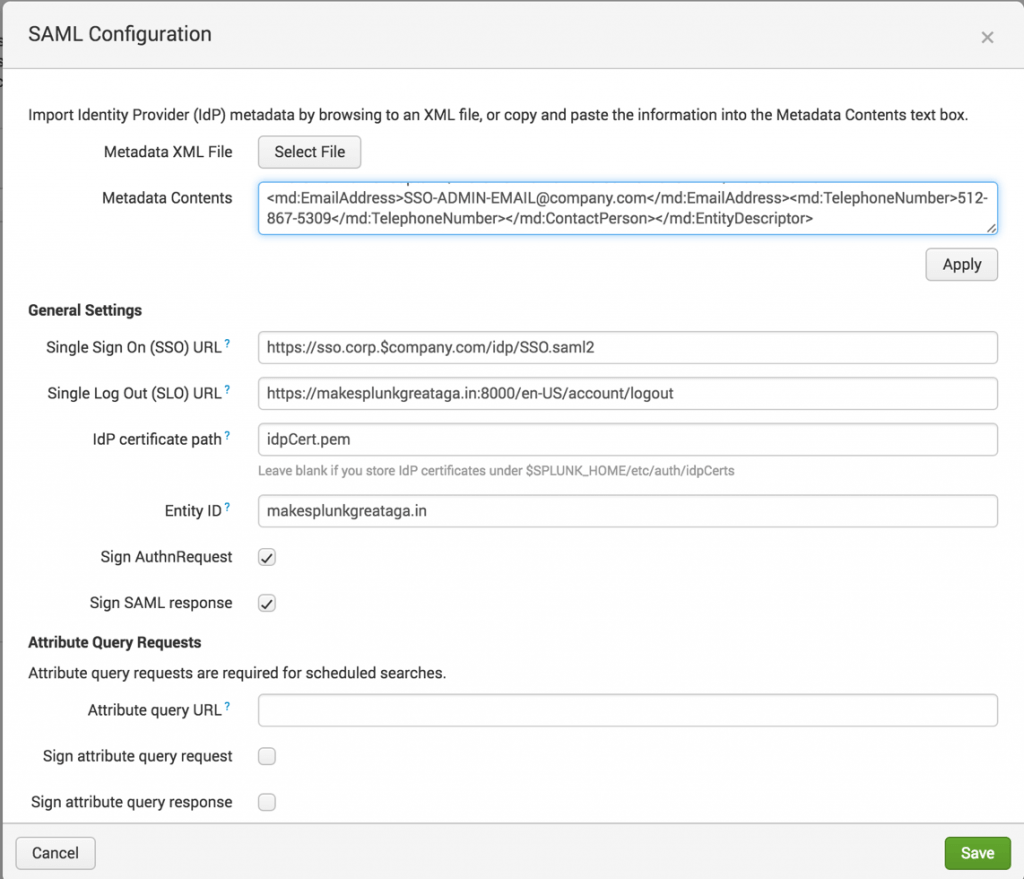
On the next page, in the upper right corner of the UI, there’s a “SAML Configuration” button, which at this point will have the red alert triangle next to it. Click the button and it will bring up the configuration pane. In this pane, shown below, you can either copy and paste the xml contents of your metadata file into the box, or you can upload it:

Click “Apply” and it will populate the fields for you based on what your SAML provider has included in the metadata file. In this example, the SLO URL had to be added because the provider does not handle logout. You will also need to fill out the “Entity ID” as this is being set by you to identify your instance to your provider. This must be unique for each individual site you have using SAML, and in most cases can and should be set to your search head’s FQDN (Fully Qualified Domain Name). After version 6.4.0, Splunk stopped requiring an attribute query URL, or SOAP username and password to accompany the attribute query. If you are on a version of Splunk earlier than 6.4.0, you can fill these fields with dummy data. Once you have filled in the needed info, click “Save.”
Once this is imported, you will need to get the generated metadata file for your instance to provide to your provider so they can configure their system to receive the SAML authN requests for signature verification.
You can export Splunk software metadata in 2 ways:
- using the /saml/spmetadataendpoint on Splunk Web.
- access the /services/admin/SAML-sp-metadataendpoint on splunkd.
Once you have the metadata, it will need to be provided to your SAML provider and wait for it to be implemented, and until it is, you will be locked out of Splunk.
Under normal circumstances, we would configure authorization here as well by clicking “new group”. This document is covering a non-standard configuration that has not been outlined on the internet prior to writing this document. For instructions on configuring SAML authZ groups, please view this documentation on Splunk’s codex.
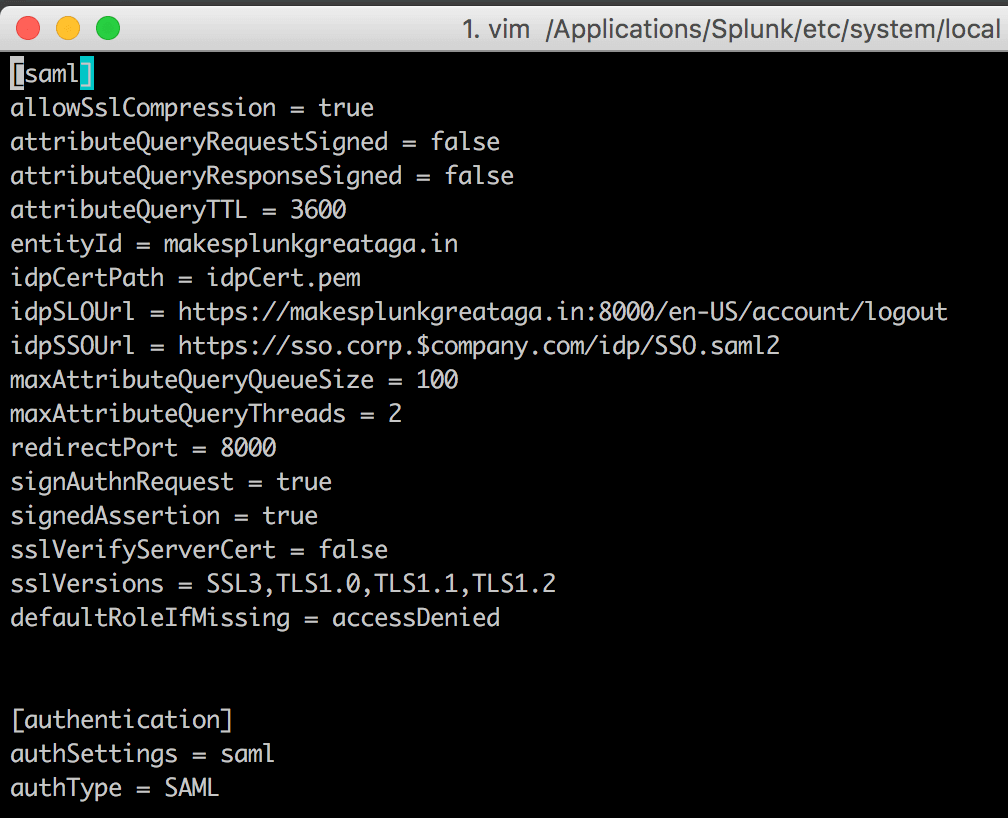
At this point we can take a look at $SPLUNK_HOME/etc/system/local/authentication.conf and verify our configuration, and also make some small tweaks, mainly adding a defaultRoleIfMissing directive, which will be covered further in the next section.
Your authentication.conf file should now look something like this:

Authorization
Now that we’ve covered authentication, it’s time we work on the authorization.
In $SPLUNK_HOME/etc/system/local/authentication.conf there was a setting we added called “defaultRoleIfMissing.” This setting comes into play when you haven’t configured any SAML groups, or in some cases can’t because of disabled attributes. Some organizations chose to disable the attributes and only let SAML/SSO handle authN (authentication), and have the application owner/application handle AuthZ (authorization).
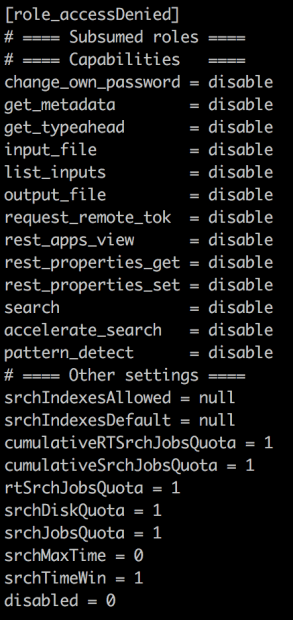
While there are specific use cases that this configuration applies to, it’s not the most elegant way to integrate with Splunk. When a memberOf attribute is not present, SAML groups cannot be configured for AuthZ due to how the group to role mapping is completed. If you log in via SAML, you are going to get assigned to whatever role is configured in defaultRoleIfMissing, which for our purposes, is set to a group which has been called accessDenied and was configured in $SPLUNK_HOME/etc/system/local/authorize.conf.
The capabilities assigned to the accessDenied role can be viewed to the left. The role has no capabilities; it cannot even edit its own password. So while someone in this role will be able to log in if they have valid AuthN credentials and a valid two-factor token, once logged into Splunk they cannot perform any actions. With the role configured, the splunkweb interface won’t even fully load into the browser.
Now that we’ve configured AuthN through SAML, and configured it to deny access to all accounts, how do we whitelist specific accounts to allow access to Splunk? Well, as discussed in a previous section, when Splunk is set to enable SAML, Splunk’s internal authZ mechanism is always on, regardless of other authN mechanisms. If we try to log in now using the enabled SAML SSO, we are going to get dropped into the accessDenied role. Since Splunk’s admin account is not an LDAP account, it will not be able to authN with SAML. Let’s go ahead and login via SAML to the corporate AD or identity management (LDAP, AD, Kerberos, TACACS+) account that is your SAML provider is configured to use. At the top of the screen, you’ll see either the username you used or the email address depending on how your SSO team has configured SAML. Log out now, as there’s nothing more that can be done while in the accessDenied role.
We are going to need to log in as an account that has permissions, so now we want to use Splunk’s internal authZ mechanism. We can bypass SAML for the time being by using the local authZ endpoint at host:8000/en-US/account/login?loginType=Splunk. This will bring us to our familiar splunkweb login page. Login with your admin account, and navigate to the access controls page, and then go to the user management pane.

When we get to the user’s pane, we can see a SAML user has been added to the user list from when we logged in previously. Pay close attention to how the username field is structured and what the username sent to Splunk contains. In the example above, the provider has passed through the full user@domain format of the usernames. Make a note of this as it will be needed moving forward. SAML users will not populate the etc/passwd file on our server, but that’s okay, we don’t want them there just yet.
So how do we whitelist specific users for authZ since we aren’t handling it with SAML? The answer is creating local accounts with complex passwords, with the same usernames as the SAML accounts being sent to Splunk.
Let’s take a minute and look at the format of the passwd file for Splunk, so we can start “whitelisting” accounts.

The structure is one user per line, colon delimited. The format we need to emulate is:
username:SHA512_hash$salt:unused:Full Name:semicolon;delimited;roles:email:unused:Knowing this format, we can create a passwd file for all of the users we want to have access to Splunk.

Of course, you’ll want to use actual hashes and salts, however, you do not need to know the passwords, since they won’t be utilized with SAML authN. As a best practice, you can use passwords that are 64 characters long and randomly generated, since the end-users don’t need to know the password to be able to log in.
You could also do a for loop in bash iterating through a list of the account names to create the passwd file for you. Here is an example script.
python -c “import crypt,random,string; pw=crypt.crypt(‘NEWPASSWORDHERE’, ‘\$6\$’ + ”.join([random.choice(string.ascii_letters + string.digits) for _ in range(16)])); print ‘:’.join([”,’admin’,pw,”,’Administrator’,’admin’,’changeme@example.com’,”,”])”Once you’ve added your users to the passwd file, go ahead and restart Splunk, and then attempt to login via SAML. If configured properly, you’ll notice that where your username was showing previously at the top of the Splunk UI, you will now see your full name. You will also notice that now you have permissions of the roles you assigned in the passwd file. Anyone not listed in the passwd file will be dropped to accessDenied. Anyone in the passwd file gets the correct assigned perms from Splunk’s internal authZ method.
Once the restart completes, verify access and you are all set and ready to go.
Happy Splunking!
Disclaimer: The information contained in this paper is provided by the author and is provided for educational and informational purposes only. The author accepts no liability for any misuse or malicious use of this information.
About SP6
SP6 is a Splunk consulting firm focused on Splunk professional services including Splunk deployment, ongoing Splunk administration, and Splunk development. SP6 has a separate division that also offers Splunk recruitment and the placement of Splunk professionals into direct-hire (FTE) roles for those companies that may require assistance with acquiring their own full-time staff, given the challenge that currently exists in the market today.


