
Splunk Enterprise Security (ES) is an app that gives Splunk Enterprise full SIEM capabilities. It adds functionality such as incident investigation, forensic and incident response, advanced threat detection, and more.
Splunk ES comes with a big list of features, but it also comes with a big price tag. Many organizations purchase Splunk ES before they’re ready to take full advantage of it and end up spending more than necessary.
In this guide, we’ll walk you through seven critical steps you should take to optimize your Splunk environment before purchasing Enterprise Security so that you can derive as much value from it as possible.
1. Ingest Logs
First and foremost, Splunk Enterprise Security requires security-related log sources. Without security logs feeding your SIEM, you have nothing but an expensive paperweight.
We recommend bringing in “core” or standard security log sources. These are generally low effort/high value logs that every organization already has, including:
- Authentication
- Windows Event Logs
- Linux Authentication Logs
- O365/Azure Audit Logs
- Endpoint
- Windows Event Logs
- Linux Audit Logs
- Malware
- Microsoft Defender for Endpoint
- Crowdstrike Falcon
- Symantec Endpoint Security
- Network Traffic
- Cisco ASA
- Palo Alto NGFW
Based on availability, your organization may have additional, secondary relevant log sources. These also work well with ES and should be considered if you still have Splunk license available after ingesting the four core log sources.
- DNS
- Splunk Stream
- Microsoft DNS
- BIND
- Email Security
- Proofpoint
- O365
- Endpoint
- Sysmon
- Intrusion Detection
- Palo Alto IDS/IPS
- Suricata
- Vulnerability Management
- Rapid7
- Qualys
- Tenable Nessus
- Web
- Zscaler
- Bluecoat
- Websense
2. Normalize Data
Now that you have your core security logs forwarding to Splunk, the next step is to normalize your data, or translate it into a vendor agnostic format. This typically involves defining field aliases, creating new fields, and generally cleaning up the ingestions. Data must be normalized as nearly all ES detections and use cases are built with generalization in mind to be applicable to any customer environment with any technology stack.
It’s crucial that your logs are as close to fully compliant as possible as many of the ES alerts require specific fields to exist with specific naming conventions. If your firewall logs are ingested with a “sourceAddress” field, for instance, you will need a field alias called “src_ip.” The CIM reference tables are a great way to review what fields are expected for the various data models.
Installing the Splunk Common Information Model (CIM) app from Splunkbase can help with data normalization. It categorizes each of the sources identified above by which data model Splunk leverages.
If your logs are being ingested with the assistance of Splunk developed add-ons and apps, they’re probably fairly close to being compliant with Splunk CIM already. If you’re unsure, or if you had to configure non-standard ingestion methods, consider installing a helper app to tidy up your logs such as CIM Buddy or SA-cim_vladiator.
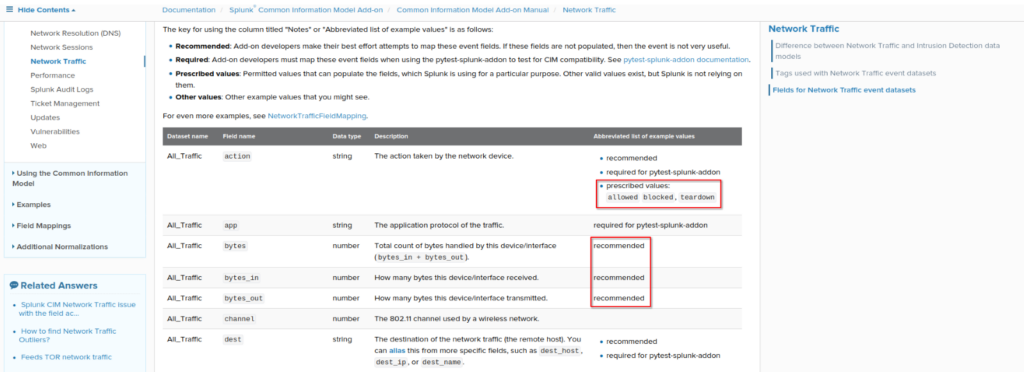
Pay attention to the fields Splunk has “prescribed values” for. These are intended to be the only values acceptable for the field. For example, the Network Traffic Datamodel has prescribed values for the “action” field and is expected to only contain the values “allowed,” “blocked,” or “teardown.” Any other values for the action field should be modified to fit one of these three or have the event excluded from the datamodel.
Additionally, some fields are marked required or recommended. For the best out-of-the-box experience with Splunk Enterprise Security, these fields should be highest priority for CIM mapping.
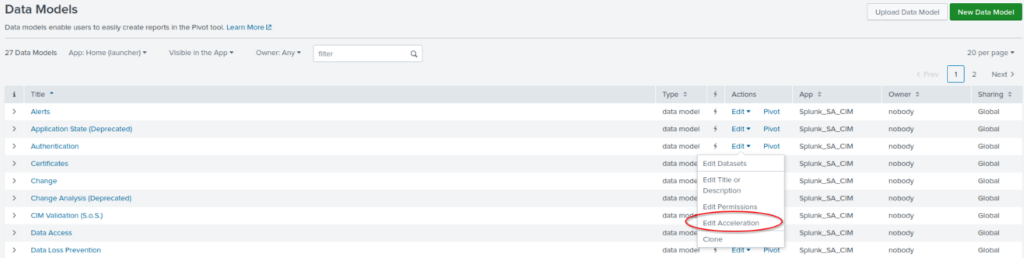
Once your data is as compliant as possible, we need to accelerate the data models for performance increases. Accomplish this by navigating to Settings → Data Models → Edit → Edit Acceleration → Accelerate. For most log sources, consider a summary range between 30 days and three months. This will impact how far back many of the ES dashboards are able to show data.
3. Leverage Free Tools First
Splunk offers two free apps that can function as a solid foundation for security alerting and investigating without the high price tag of Enterprise Security – Splunk Security Essentials and InfoSec App for Splunk. Many organizations may want to consider leveraging these two to the fullest before moving into ES.
Splunk Security Essentials (SSE)
Splunk Security Essentials (SSE) provides a single view of all Splunk-built repositories and alerts (including those in Enterprise Security) and is designed to help organizations identify and quickly enable security alerting based on their business vertical, technology stack, and concern. These are all organized by security maturity, MITRE ATT&CK tactics and techniques, technology type, and more.
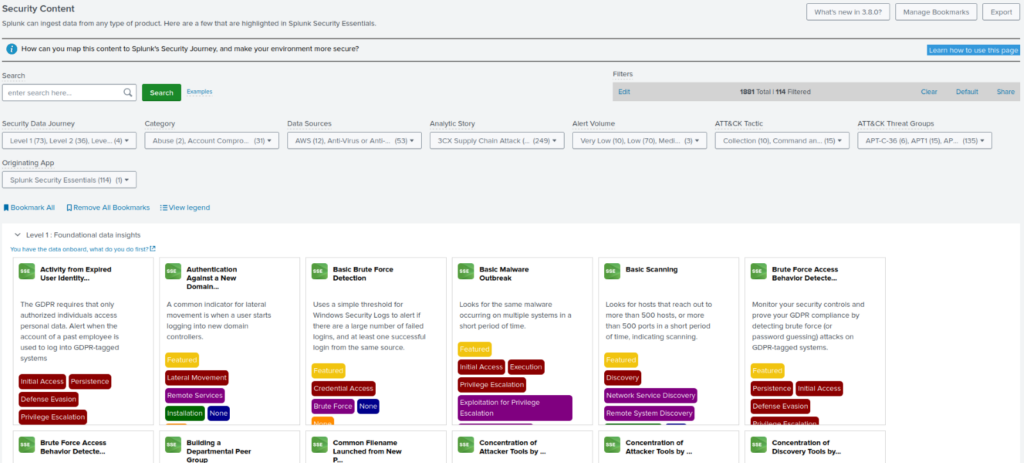
SOC leadership can work with Splunk administrators to identify which alerts should be enabled, how they should be tuned, and who should be notified in the event of a detection. SSE was designed to work alongside Splunk Enterprise Security, so time spent configuring various use cases and responses is not time wasted preparing for a full SIEM tool.
InfoSec App for Splunk
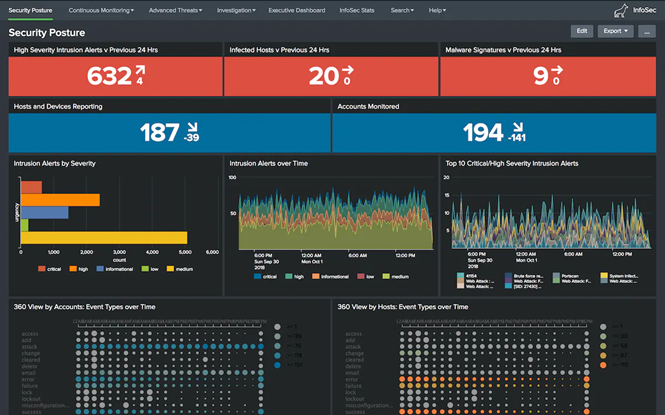
The InfoSec App is intended to be a one-stop-shop for SOC analysts to receive alerts, investigate activity, and make decisions as quickly as possible. This app comes with dozens of dashboards and views to track everything from general security posture to granular security events such as suspicious authentications and anomalous host activity. It provides executive overviews as well.
Note: Most of what is contained within this app is replaced with Enterprise Security.
4. Set Up Enterprise Security Prerequisites
If you’ve made it this far, you should now have a robust Splunk environment with regular alerting and integration with Splunk’s free security apps. The following steps will provide minimal immediate value for base Splunk Enterprise, but they’re necessary for Splunk Enterprise Security. Addressing these prior to purchasing the premium app can save time and money.
5. Set Up Asset and Identity Data
Ensure you have a source of truth that can provide information about all hosts and users within the organization. Common tools for this are LDAP and CMDBs. These should be as up-to-date as possible, and your organization should have policies and procedures to ensure they’re updated as soon as new hosts are brought online/offline and new employees are onboarded/offboarded.
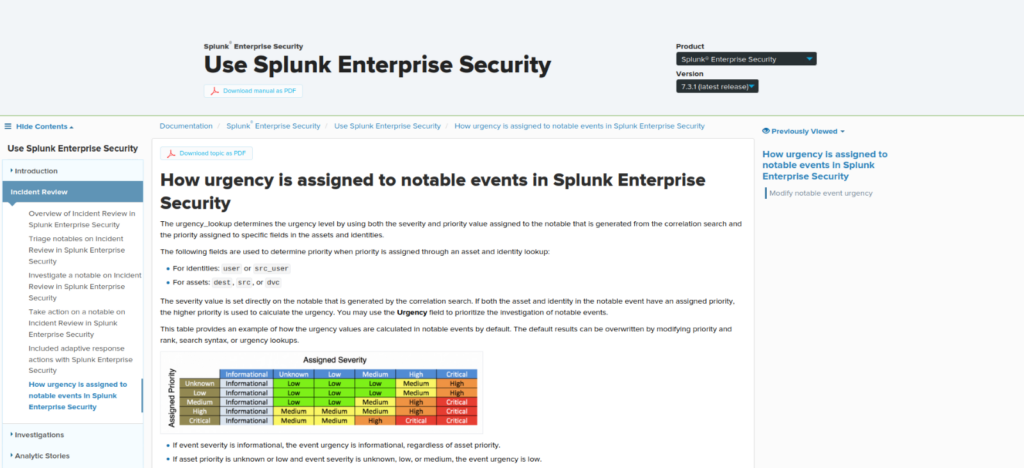
Enterprise Security has the functionality to track user and host activity and increase/decrease alert urgency based on the assets involved. An alert that is typically of medium urgency, for instance, may be critical if it involves a domain administrator or domain controller.
While this information is not required for ingestion prior to Splunk ES, it should be accurate and ready prior to deployment.
6. Prepare Threat Intelligence
Splunk Enterprise Security allows organizations to directly feed threat intelligence into Splunk for correlating against all log sources. If your EDR solution provides exportable threat-intel, you can leverage that data against your email security logs, network traffic logs, authentication logs, or anything else you may be ingesting.
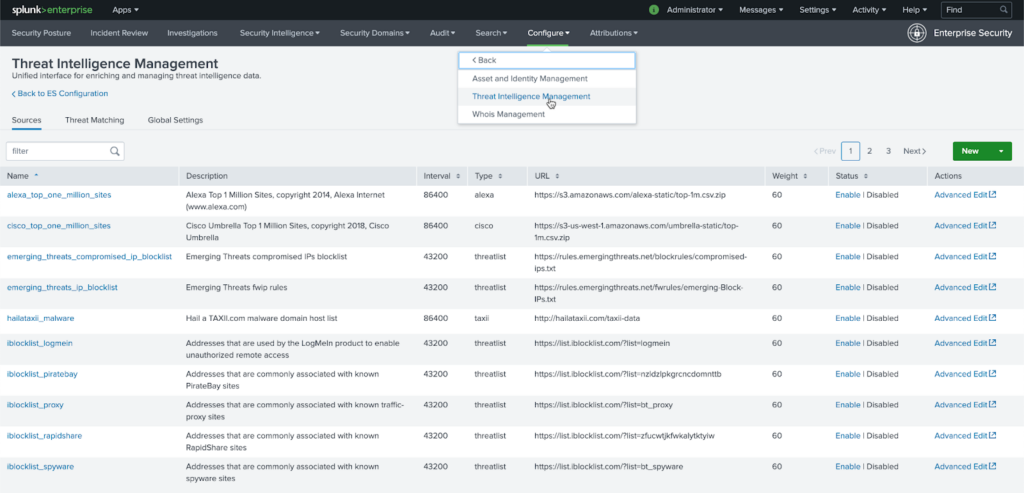
To make things a bit easier, several Open Source Intelligence (OSINT) feeds are shipped out-of-the box; however, many organizations quickly replace these with paid, proprietary feeds that have industry focus or more accurate information. ES allows direct ingestion of STIX and TAXII feeds as well as URL-based threat intelligence. If your tooling allows exporting of threat intelligence but not as STIX or TAXII, you can also forward the events to Splunk for indexing and correlation.
7. Get Your Hardware Ready
The last thing you should have at the ready is the hardware for Splunk Enterprise Security. ES is installed as a Splunk App onto Splunk Enterprise, but the app itself has high system requirements. It is strongly recommended to have a second dedicated host for Enterprise Security with the following hardware:
- 16 physical cores (or 32 vCPU)
- 32 GB memory
Keeping the ES search head separate from your standard search head ensures performance issues from either do not impact the other. It also helps separate roles and access for non-security focused Splunk users. For Splunk Cloud customers, an ES license will automatically include a new cloud Search Head.
Once your hardware is setup, your organization is all set to deploy Splunk’s full SIEM solution, Enterprise Security.
Get More Value Out of Splunk with SP6
As a 2023 Splunk Partner of the Year, we’re committed to helping organizations maximize the value of their Splunk investment. Our certified engineers have 10+ years of experience helping companies deploy, manage, and optimize Splunk and all of its premium apps.
Get in touch with us today to discover how we can simplify your Splunk Enterprise Security deployment.